RingRoost is a complete communication system. You can use RingRoost to fulfill a variety of needs. You can use RingRoost to manage your office multi-line phone system. You can set up one phone to make and receive calls. You can integrate your phone system into a database. You can set up interactive voice response, host conference calls, record calls, and more.
RingRoost works by allowing you to build your call system through a simple drag & drop interface. Each call system you set up is called a PBX (private branch exchange). Each PBX can have multiple phones with their own extension. Any phone within a PBX can call another phone (for free) by dialing that phone’s extension. You can also ring multiple extensions, share voicemails, and set up call hunting within a PBX.
Call Controls
Each PBX is assembled using call “controls.” Each control has its own function. You add a call control to your PBX by dragging and dropping the control onto your PBX dashboard. You can connect the call controls to one another in any manner that allows your call system to work like you want it to.
Basic Properties of a Control
Each call control has a few "basic properties." When you drop the control onto your PBX you will be able to see and edit the control’s basic properties. You can hide/show the basic properties in two ways. You can double-click the control or click the arrow icon at the top right corner of the control.
Advanced Properties of a Control
Each call control also has advanced properties. You access these properties by right-clicking the control and selecting "properties." You can edit the properties. The advanced properties seldom need editing. Default settings are usually the correct setting for most people. Depending on your needs you may want to change them.
Here is an example of how to access the advanced properties of a control:
Below is a simple example of a call system that answers a call, prompts the caller to enter the department they want to reach, then dials that department’s number.
Commonly Used Call Controls
Not all call controls are equal. Depending on your call system you will probably just use a few controls. Most PBXs will have at least one "Answer Call” control and several "SIP Phone” controls. (A SIP phone is a phone that makes calls over the internet.) The “SIP Phone” control can be any SIP enabled device. It’s usually a SIP hard phone set up in an office. It can also be a softphone like Zoiper, used through a computer or mobile device. The "Dial” control is another common control that allows the call flow to dial any number. The below sections explain all the controls in depth.
Answer Call Control
The "Answer Call" control is the starting point of how you handle a call coming into your PBX. You will connect the "Answer Call" control to another control. This is how you begin your call flow. Each "Answer Call" control handles one phone number. So, if you have 5 phone numbers, you need 5 "Answer Call" controls connected to the phone you would like to ring.
Basic Properties
Number
This is the phone number that’s handled by this control. When someone dials this number the call is routed to this control. See more about phone numbers here.
Cname Lookup
If this option is checked, RingRoost looks up of the name of the person calling. The caller's name and phone number are passed throughout the call flow. The {caller_name} variable is populated in the call flow and can be accessed later in the call. See more here about call variables
Advanced Properties
Control ID
Unique ID of this control. It’s created by RingRoost and is not editable by users. It may be referenced by other controls.
Redirect Control ID
This is the unique ID that guides where the call flow will go after this control. It’s set by dragging two elements together, or entered in manually.
Sip Phone Control
The “SIP Phone” control allows you to register any SIP capable device with RingRoost. Once registered you can make and receive calls on that device. For instructions on how to register a SIP device see: How to register a SIP phone.
SIP Phone Voicemails
Once registered with RingRoost, you may set up your voicemail greeting. Dial *00 on your SIP device. You will be prompted to record and save a voicemail greeting. To check your voicemail, dial *98 on your SIP device. When a new voicemail has come in, RingRoost will send a “message waiting” indicator to your phone. Depending on your SIP phone it will probably be a blinking light or similar indicator that you have a message waiting in your voicemail.
Redirecting after Ringing a SIP Phone
Any call sent to a “SIP Phone” control will ring that phone. If the "SIP Phone" control has a redirect, the calling party is sent to the next control. Otherwise, the calling party is sent to the phone’s voicemail.
SIP Phone Extensions
You can assign an extension to any "SIP Phone" control on RingRoost. Each extension can be reached by any other SIP phone in that PBX, by dialing the extension number.
Dialing Out
You can set the default country on your PBX. If you’re calling within your country, dial the phone number (no country code prefix). For example, if your PBX is in the USA, dial any ten-digit phone number and you’ll be connected.
If you’re making outbound calls to another country, dial the prefix 001, followed by the country code and phone number. For example, to call a UK number you would dial 001 44 1529 30683.
Note: Note: Traditional PBXs often require a key to dial out (usually 9). RingRoost does not require any dial out key.
Basic Properties
Extension
The extension number used to reach this phone from any other SIP phone within the same PBX. It's best to use a two or three digit extension for phones, such as 11, 12, or 333.
Caller ID
The number that shows up to the called party when making calls from this SIP device. You may set the caller ID to any number you have bought or assigned to your RingRoost account.
E911
The caller ID sent to emergency services personnel, in the case of an emergency. This number has a physical address associated with it. Please make sure you have enabled E911 unless your governing body does not require it. See more about enabling E911 here..
VM Box
The voicemail box for this phone. You can share one voicemail box across multiple SIP phones. You’ll need to set up a voicemail greeting for each SIP phone, by dialing *00. You can check the voicemail messages by dialing *98.
Record
If enabled, all calls to and from this phone are recorded. You can listen to the recordings under the "Recordings" tab in your top menu.
Rings
The number of times your SIP phone rings before going to voicemail or redirecting to the next control in your flow.
SIP Host
The hostname you’ll need to input into your SIP client when registering your SIP device.
SIP User
The SIP username you’ll need to input into your SIP client when registering your SIP device.
SIP Pass
The SIP password you’ll need to input into your SIP client when registering your SIP device.
Speed Dial
This allows you to program customized keys that redirect to a specific control. For example, you can program 1 to connect to a “Dial” control that dials a particular phone number.
Advanced Properties
Control ID
Unique ID of this control. It’s created by RingRoost and is not editable by users. It may be referenced by other controls.
Redirect Control ID
This is the unique ID that guides where the call flow will go after this control. It’s set by dragging two elements together, or entered in manually.
Calling Party Transfer
If checked, this allows the calling party to transfer the call at any time throughout the call. Pressing #1 will start a blind transfer. Pressing *2 will start an attended transfer.
Note: Most SIP phones have their own transfer functionality. It's best to use the phone’s transfer button rather than using this setting...
Called Party Transfer
If checked, this allows the called party to transfer the call at any time throughout the call. Pressing #1 will start a blind transfer. Pressing *2 will start an attended transfer.
Note: most SIP phones have their own transfer functionality. It's best to use the phone’s transfer button rather than using this setting.
Codec
This is the media codec used by this phone. Generally, we recommend using ulaw. If you are in a low bandwidth network, g729 may help improve call quality. Please ensure you have enabled and prioritized the same codec on your SIP device and in RingRoost.
Allow Intercom Dialing
This "intercom feature" allows you to dial *07 + extension (extension must be on the same PBX). Your call will be auto-answered by the dialed extension. Note that this feature requires a setting to be enabled on your SIP phone See how to enable the allow intercom feature on your phone here (This feature is supported by most, but not all, major phones.)
Dial Control
The “Dial” control dials a phone number or SIP address in your call flow. It can dial multiple phones or SIP addresses. If multiple numbers are dialed, whichever phone answers the call first will win the call.
Basic Properties
Number or SIP Address
Either a PSTN phone number within a certain country or a SIP URL. An example of a phone number format is 7043436748. An example of a SIP address format is username@host:port.
Caller ID
The caller ID that appears on the dialed phone. If set to "Inbound Caller" the caller ID of the inbound caller will show appear the phone.
Record Call
If enabled, all calls through the control are recorded. You can listen to the recordings under the "Recordings" tab in your top menu.
Add In Call Listener
Adds a control that allows you to trigger events during the call by pressing customized keys.
Add Call Screener
Adds a control that allows the dialed party to screen or redirect the call as customized by the control.
Advanced Properties
Control ID
Unique ID of this control. It’s created by RingRoost and is not editable by users. It may be referenced by other controls.
Redirect Control ID
This is the unique ID that guides where the call flow will go after this control. It’s set by dragging two elements together, or entered in manually.
Play Music on Hold
Plays hold music instead of ringing when the dialed party is trying to be reached.
Timeout after dial
The time in seconds a phone rings before continuing in the call flow. Leaving this field blank sets no timeout, which is generally the desired behavior.
Allow Direct Media
Allows the calling party to connect directly to the called party. If set to no, the media stream will travel through RingRoost. Changing this setting to yes can cause call audio issues. Please ensure you understand this setting before changing.
Calling Party Transfer
If checked, this allows the calling party to transfer the call at any time throughout the call. Pressing #1 will start a blind transfer. Pressing *2 will start an attended transfer.
Note: Most SIP phones have their own transfer functionality. It's best to use the phone’s transfer button rather than using this setting.
Called Party Transfer
If checked, this allows the called party to transfer the call at any time throughout the call. Pressing #1 will start a blind transfer. Pressing *2 will start an attended transfer.
Note: Most SIP phones have their own transfer functionality. It's best to use the phone’s transfer button rather than using this setting.
Menu Control
Used to create interactive voice response (IVR) prompts. These prompts allow callers to do things like select a particular department or extension. The “Menu” control plays an audio file or reads text back to the caller. At any point, the caller can press one or more digits and they will be directed to the menu item they selected. (You will need to add IVR Menu Items to redirect the user appropriately.)
Note: If the menu item the caller selects does not exist, the “Menu” control will replay the text.
Adding a Recording
The “Menu” control allows you to type any text to be spoken to the caller. You can add a recording two ways. You can upload a mp3 audio file. Or, you can use the call-to-record feature. The system will call your phone and prompt you to record a file. After you upload or call-to-record" a file you’ll see the file in your Recordings Library. You can click Add To Chart to add the recording to the “Menu” control. The control will play the recording back to the caller when they call.
Mixing Text, Recordings, and Call Variables.
The “Menu” control allows you to mix text, custom recordings, and call variables. Using call control variables, you can do things like upload a custom greeting and read the callers name back to them. See more about call variables here .
Basic Properties
Text to Say
The text, or recording, that’s played back to the caller. You can mix text, recordings, or dynamic variables in this field
Voice
The voice used in the text-to-speech engine. You can select the gender of the voice.
Repeat
The number of times the text-to-say repeats before moving on in the call flow.
IVR Menu Items
The items available for the caller to select. A menu item can by any digit from 1-1000. We generally recommend using single digits. If VRU is set to yes in the advanced properties, the menu item can be any word or digit.
Add in Call Listener
Adds a control that allows you to trigger events during the call by pressing customized keys.
Add Call Screener
Adds a control that allows the dialed party to screen or redirect the call as customized by the control.
Advanced Properties
Control ID
Unique ID of this control. It’s created by RingRoost and is not editable by users. It may be referenced by other controls.
Redirect Control ID
This is the unique ID that guides where the call flow will go after this control. It’s set by dragging two elements together, or entered in manually.
IVR Menu Items
These are the the items that are available for the user to select. A menu item can by any digit from 1-1000 (Generally, we recommend using single digits 0-9). If VRU is set to "yes" in the advanced properties, the menu item can be any word or digit.
Capture VM Control
Plays a custom greeting to the caller, then captures a voicemail message. It saves the voicemail message in a selected voicemail box. You can check the voicemail later using the "Check VM” control.
This control will set the dynamic variable "voicemail_left" to the value 1 if a new voicemail is left, which can be used after leaving a voicemail to trigger various controls. The call flow can continue after a voicemail is left, however note that the caller will have hung up.
Note: If using a “SIP Phone” control, you probably don't need to use the “Capture VM” control. The “SIP Phone” control has voicemail functionality built in. see more about the SIP Phone control here .
Basic Properties
Text to Say
The text, or recording, that’s played back to the caller. You can mix text, recordings, or dynamic variables in this field.
Voice
The voice used in the text-to-speech engine. You can select the gender of the voice.
repeat
The number of times the text-to-say repeats before moving on in the call flow.
VM Box
The voicemail box the voicemail is stored in. You can add, view, edit, and delete voicemail boxes in the Voicemail tab of your top menu.
Advanced Properties
Control ID
Unique ID of this control. It’s created by RingRoost and is not editable by users. It may be referenced by other controls.
Redirect Control ID
This is the unique ID that guides where the call flow will go after this control. It’s set by dragging two elements together, or entered in manually.
Check VM Control
Allows the user to access voicemail. If it's a protected voicemail box, the user must input a password upon prompting.
After playing an unheard message the voicemail box will prompt the user with these options:
1 - Skip message
2 - Replay Message
3 - Delete Message
4 - Call the number (that left the voicemail) back
5 - Get call details
Basic Properties
VM Box
The voicemail box the voicemail is stored in. You can add, view, edit, and delete voicemail boxes in the Voicemail tab of your top menu.
Advanced Properties
Control ID
Unique ID of this control. It’s created by RingRoost and is not editable by users. It may be referenced by other controls.
Redirect Control ID
This is the unique ID that guides where the call flow will go after this control. It’s set by dragging two elements together, or entered in manually.
Time Filter Control
The “Time Filter” control filters calls based on the time of day. This can be helpful for businesses that only want to handle calls during a specific block of time in the day. Calls that come in within the From and To fields are directed down the “if true” route. All other calls are directed down the “if false” route.
Basic Properties
Timezone
Desired time zone for this “Time Filter” control. This is usually your time zone.
Select Days
The day (or days) of the week you want calls to come in.
From
The start time of each day (or days) you want calls to come in.
To
The end time of each day (or days) you want calls to come in.
If False
The path calls go down if the current time is not within the From and To fields.
If True
The path calls will go down if the current time is within the From and To fields.
Advanced Properties
Control ID
Unique ID of this control. It’s created by RingRoost and is not editable by users. It may be referenced by other controls.
Redirect Control ID
This is the unique ID that guides where the call flow will go after this control. It’s set by dragging two elements together, or entered in manually.
Decision Control
The “if” statement has 3 parts. Two values and an operator. Call variables are used in the “Decision” control in logical order, for an intended outcome.
Note: If using the "from number”, the number will also contain the country code (i.e. 17049417533).
Basic Properties
If True
The path calls take when the "if” statement evaluates to true.
If False
The path calls take when the "if” statement evaluates to false.
Advanced Properties
Control ID
Unique ID of this control. It’s created by RingRoost and is not editable by users. It may be referenced by other controls.
Redirect Control ID
This is the unique ID that guides where the call flow will go after this control. It’s set by dragging two elements together, or entered in manually.
Call Queue Control
Pools calls while waiting on the next control to finish (while the control is busy). For example, let’s say the “Call Queue” control is connected to a “Dial” control. Call 1 comes in, dials, and connects to a phone. Then, call 2 comes in. Rather than sending the call to the phone that’s in use, the control holds call 2 in the queue until the first call completes. When the first call is finished, the second call connects to line 2. While the call is waiting in the queue, the caller hears hold music.
Basic Properties
Seconds to Wait
The number of seconds to hold the caller in the queue before sending them to Redirect After wait. If this is not set, the caller will wait in the queue indefinitely.
Redirect after Wait
If Seconds To Wait is set and the caller has waited for the set duration, the caller is redirected down this path.
Advanced Properties
Control ID
Unique ID of this control. It’s created by RingRoost and is not editable by users. It may be referenced by other controls.
Redirect Control ID
This is the unique ID that guides where the call flow will go after this control. It’s set by dragging two elements together, or entered in manually.
Capture Digits Control
Gathers input from a caller. It works by reading or playing a customizable prompt to the caller. The caller can then input digits that are stored in a call variable to be used later in the call flow. This control can capture various types of information from the caller. It can also be used in conjunction with the "Load Variables" control to store data into a 3rd party database.
Basic Properties
Text to Say
The text, or recording, that’s played back to the caller. You can mix text, recordings, or dynamic variables in this field.
Voice
The voice used in the text-to-speech engine. You can select the gender of the voice.
Repeat
The number of times the text-to-say repeats before moving on in the call flow.
Set Variable
The variable populated by the user input. This should be a text variable with no spaces or special characters (you may underscore "_"). An example is: "caller_last_four_social". You access this variable the same as any other call variable. See more on call variables here .
Advanced Properties
Control ID
Unique ID of this control. It’s created by RingRoost and is not editable by users. It may be referenced by other controls.
Redirect Control ID
This is the unique ID that guides where the call flow will go after this control. It’s set by dragging two elements together, or entered in manually.
Send Text Control
Will trigger a text message to a phone number throughout the call flow. You must have purchased a least one phone number that is text message capable.
Note: Outbound SMS numbers are not currently voice capable. You will need a unique number for sending outbound text messages.
Basic Properties
Number to Text
The number where the text message is sent.
From
The SMS outbound capable number purchased through RingRoost.
Message
The text message. You may add call variables in this field. See more on call variables here .
Advanced Properties
Control ID
Unique ID of this control. It’s created by RingRoost and is not editable by users. It may be referenced by other controls.
Redirect Control ID
This is the unique ID that guides where the call flow will go after this control. It’s set by dragging two elements together, or entered in manually.
Click2Call Control
Will answer an embedded Click2Call button on your website by copying and pasting code found in the “Click2Call” control. It works like the “Answer Call” control. It answers the call and sends it to whichever redirect element you have set. See more on click2call here.
Basic Properties
Code
The code you will copy and past into your website.
Advanced Properties
Control ID
Unique ID of this control. It’s created by RingRoost and is not editable by users. It may be referenced by other controls.
Redirect Control ID
This is the unique ID that guides where the call flow will go after this control. It’s set by dragging two elements together, or entered in manually.
Answer SMS Control
Works like the “Answer Call” control, except it handles all text messages to the designated phone number.
Basic Properties
SMS Number
The inbound number that the SMS control handles.
Enable Cname Lookup
Looks up the name of the person sending the text.
Advanced Properties
Control ID
Unique ID of this control. It’s created by RingRoost and is not editable by users. It may be referenced by other controls.
Redirect Control ID
This is the unique ID that guides where the call flow will go after this control. It’s set by dragging two elements together, or entered in manually.
JSON URL Control
The “Load Variables” control works by making an HTTP request to a given URL and populating any call variables returned from the URL. The response is a JSON object. This control allows call variables in the JSON URL, so it's possible to pass GET parameters to a given URL. See more about call variables here .
Basic Properties
JSON URL
A 3rd party URL that RingRoost makes an HTTP/GET request to. If this URL returns a JSON key, value objects the variables are set as call variables.
Advanced Properties
Control ID
Unique ID of this control. It’s created by RingRoost and is not editable by users. It may be referenced by other controls.
Redirect Control ID
This is the unique ID that guides where the call flow will go after this control. It’s set by dragging two elements together, or entered in manually.
Conference Control
Allows you to set up a conference room. There is no limit to members in a conference room.
Basic Properties
Password
Password required to enter the conference room. If no password is required the conference room will allow anyone in.
Advanced Properties
Control ID
Unique ID of this control. It’s created by RingRoost and is not editable by users. It may be referenced by other controls.
Redirect Control ID
This is the unique ID that guides where the call flow will go after this control. It’s set by dragging two elements together, or entered in manually.
Send Email Control
Will trigger an email. Currently only supports text emails (not HTML).
Basic Properties
To
The list of email addresses the message is sent to. To send the message to multiple emails separate them with a comma. For example: myname@gmail.com, myname2@gmail.com. This field supports dynamic call variables.
Subject
The Subject of the email. This field supports dynamic call variables.
Message
The email message that’s sent. It currently only supports text emails, no HTML. This field supports dynamic call variables.
Advanced Properties
Control ID
Unique ID of this control. It’s created by RingRoost and is not editable by users. It may be referenced by other controls.
Redirect Control ID
This is the unique ID that guides where the call flow will go after this control. It’s set by dragging two elements together, or entered in manually.
Answer Fax Control
Receives faxes from any RingRoost number. This control is generally used with the "Send Email" control, It allows you to set up a Fax to Email system. Connect the "Answer Fax” control" to the "Send Email” control" (with an email address). The system will forward all faxes to that email address as an attachment.
Note: It’s possible to use the same number for receiving both voice calls and faxes. But, we recommend getting a dedicated number for fax. The system to pauses for about a second to detect if the call is a voice call or fax, causing a slight delay in voice calls.
Basic Properties
Fax Number
The number that receives incoming faxes.
Advanced Properties
Control ID
Unique ID of this control. It’s created by RingRoost and is not editable by users. It may be referenced by other controls.
Redirect Control ID
This is the unique ID that guides where the call flow will go after this control. It’s set by dragging two elements together, or entered in manually.
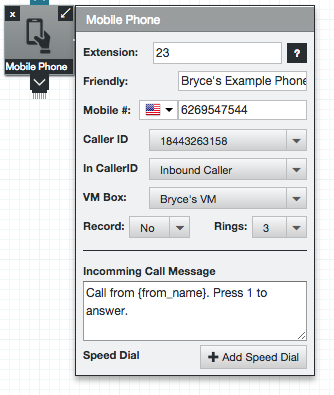
Mobile Phone Control
Allows you to connect your mobile phone with RingRoost. You will need to download the RingRoost App for your iphone or Android device.
Note: The RingRoost Mobile App makes and receives calls via your cell phone provider, so you still need a carrier.
Basic Properties
Extension
This number is used to reach this mobile phone from any other SIP or mobile phone within the same PBX. It's best to use a two or three digit extension for phones, such as 11, 12, or 333.
Friendly
A friendly, or nickname so you can identify this mobile phone.
Mobile #
The mobile number (provided by your cell phone carrier) you connect with RingRoost. This is required to make and receive calls on your mobile phone.
Caller ID
The caller ID that appears when you call someone (outbound caller ID). It must be a RingRoost number or a number that’s assigned to RingRoost.
In CallerID
The number that shows up on your phone when someone calls you (inbound caller ID). You can show the same number or select "Inbound Caller" to see the number that’s calling you.
VM Box
The voicemail box for this mobile phone. You can share one voicemail box across multiple SIP phones. You’ll need to set up a voicemail greeting for each SIP phone, by dialing *00.
Record
If enabled, all calls to and from this phone are recorded. You can listen to the recordings under the "Recordings" area in your top menu.
Rings
The number of times your mobile phone rings before going to voicemail or redirecting to the next control in your flow.
Incoming Call Message
The message that plays when a call rings your mobile phone. If you press 1 during this message you’re connected to the caller. Otherwise, the call goes to voicemail or continues down the call flow.
Speed Dial
This allows you to program customized keys that redirect to a specific control. For example, you can program 1 to connect to a “Dial” control that dials a particular phone number.
Advanced Properties
Control ID
Unique ID of this control. It’s created by RingRoost and is not editable by users. It may be referenced by other controls.
Redirect Control ID
This is the unique ID that guides where the call flow will go after this control. It’s set by dragging two elements together, or entered in manually.
Calling Party Transfer
If checked, this allows the calling party to transfer the call at any time throughout the call. Pressing #1 will start a blind transfer. Pressing *2 will start an attended transfer.
Note: Most mobile phones have their own transfer functionality. It's best to use the phone’s transfer button rather than using this setting.
Called Party Transfer
If checked, this allows the called party to transfer the call at any time throughout the call. Pressing #1 will start a blind transfer. Pressing *2 will start an attended transfer.
Note: Most mobile phones have their own transfer functionality. It's best to use the phone’s transfer button rather than using this setting.
Contacts Control
Allows you to store and retrieve information about an inbound caller. If the caller is a saved contact, any tags assigned to that caller will populate as call variables, which can be used anywhere in the call flow. See more on call variables here)
If the calling party is not a contact, the control saves the contact (if that property is selected). You can view your contacts under the Contacts tab of your top menu. You can assign custom tags to a contact that can be used as variables in your call flow.
Basic Properties
Auto Save Contact
If checked, every call that passes through is saved as a new contact. By default, the number and caller name (if available) is saved.
Key/Val
Allows you to tag a contact based on a call variable that existed before using this control.
Advanced Properties
Control ID
Unique ID of this control. It’s created by RingRoost and is not editable by users. It may be referenced by other controls.
Redirect Control ID
This is the unique ID that guides where the call flow will go after this control. It’s set by dragging two elements together, or entered in manually.
Voicemail
The first thing you’ll need to do is go to the "Voicemail" tab in your top menu and add a voicemail box. Each voicemail box can be shared across multiple devices. You may also set a voicemail password on each voicemail box.
You can capture voicemail messages using the "SIP Phone" or "Capture VM” control. Check your voicemail a few different ways. You can check it through your SIP phone using the "Capture VM" control, through the web interface, or by emailing the voicemails to yourself.
SIP Phone
The “SIP Phone” control has voicemail functionality built in. If you register a SIP device with RingRoost, dial *98 to check your voicemail. You will need to add a custom greeting for every SIP device (even if they share the same voicemail box). Dial *00 to set up a custom greeting. Each "SIP Phone" control uses a voicemail box that you will need to set up under the “Voicemail” tab in your top menu.
Note: Some SIP phones allow you to input a voicemail user ID. Enter *98 in this field and you will be able to use the phone’s voicemail button to access your voicemail box.
Check VM/Capture VM Controls
You can also use these two controls to capture voicemail and check voicemail. You will need to select which voicemail box you are checking/capturing on both controls.
Web Interface/ Email
To see the voicemail messages in the box, click view/edit on that voicemail box. You can trigger one or more emails that contain a .mp3 attachment of the voicemail when a new message is left. Just add an email address (or multiple email addresses separated by commas).
Mobile Phone App (IOS + Android)
Overview
The RingRoost Mobile App lets you connect your RingRoost PBX to your mobile device. Using your RingRoost mobile number, you can make and receive calls, check voicemail, manage contacts, and view your call history.
How it works
The mobile app makes and receives calls via your cell provider (AT&T, Verizon , T-Mobile, etc.). This means you need to have a mobile service provider and a mobile number provided by them.
Note: Even though you make calls via your cell carrier, your personal cell number is never seen by people you call. They only see your RingRoost business number.
Getting the App & Getting Started.
You can download the RingRoost Mobile App through the App Store on your iPhone or Android device. If you aren’t using iPhone or Android, you can access the App from your mobile browser at:
https://m.ringroost.com.
Note: The browser based application at m.ringroost.com works exactly the same as the downloadable app (you just have to deal with the browsers url bar).
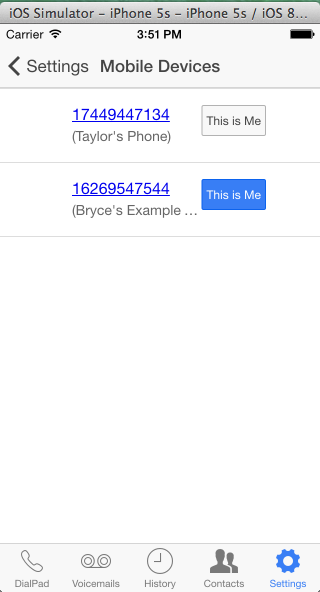
Once you‘ve downloaded the App, login with your RingRoost email and password. If you don't have a RingRoost account you can create one at: https://www.ringroost.com/signup.php.
After you login you’ll need to connect your device with the RingRoost "Mobile Phone” control. It’s a good idea to have at least one "Mobile Phone” control set up on your RingRoost PBX. Here’s a
quick video on how you do that. Below are images showing the "Mobile Phone Control" and associating that control with your device.
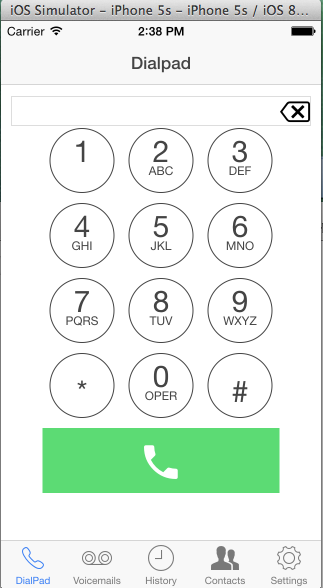
Making Calls
Under the dial pad tab, dial the phone number you want to call. You can call a contact, or call back from a voicemail by swiping left and clicking Call Back.
When you make a call, your cell phone dials into your RingRoost PBX. It sets the appropriate Caller ID then connects you with the called party.
Receiving Calls
Calls first come into your RingRoost PBX, to the appropriate "Mobile Phone” control. The call attempts to connect that phone by dialing the cell number associated with that phone.
Your cell phone will ring like a normal call. When you pick up the call on your cell phone, you’ll hear a prompt with the caller’s information. If you want to take the call press "1" to be connected. Otherwise, the call goes to your RingRoost voicemail, or down the call flow.
Note: This process allows you receive calls on your cell phone without interrupting your RingRoost call flow. The caller never knows they are connecting to your personal cell phone.
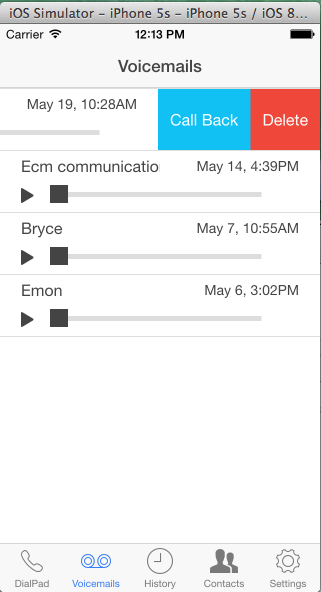
Voicemail
If you want missed callers to go to voicemail, you will need to set up a voicemail greeting. To do that, dial *00 on the Dial Pad of your RingRoost App. You’re guided through a prompt to record a voicemail greeting.
You can listen to your voicemails under the voicemail tab, and "call back" if needed.
Note: You can update your voicemails, contacts, and call history by pulling down on your screen.
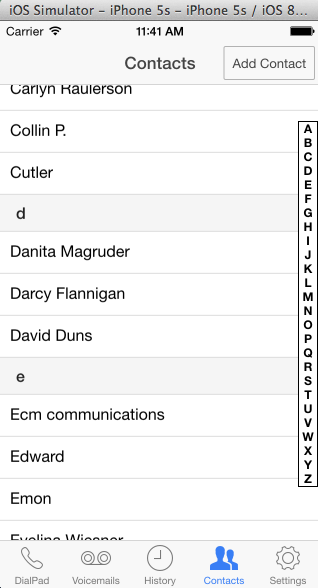
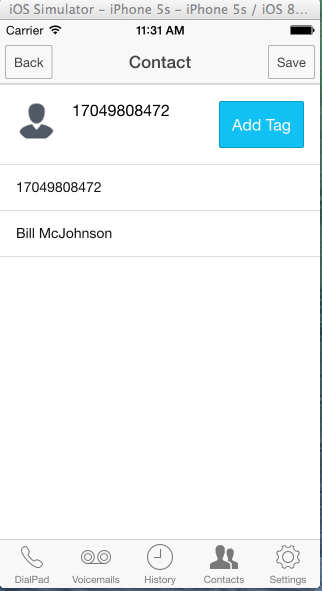
Contacts
You can view, add, edit, and call your RingRoost contacts from your mobile device. You can also assign tags to your contacts.
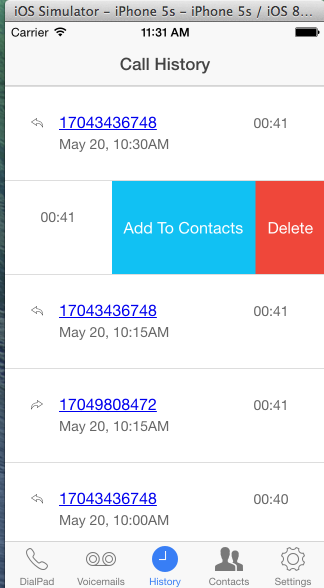
Call History
The call history shows all your inbound and outbound calls. Missed calls are red. You can add a number in your call history to your contacts by swiping left.
Block Calls List
Prevent unwanted callers from calling your RingRoost PBX. Block them in the Contacts tab of your top menu by checking the box under Blocked. You can add a new contact and block them, or block any of your current contacts.See more about saving contacts here. .
The block call list features is great for prevent unwanted spammers who want stop trying to get a hold of you throughout the day.
Note that blocked contacts will not be able to reach your PBX and you will not be charged for the call.