Block Unwanted Callers

You can now prevent unwanted callers from calling your RingRoost PBX by blocking them under the “Contacts” tab of your RingRoost account. You can add a new contact and then block them, or block any of your current contacts (see more on the saving contacts here). The block call list features is great for prevent unwanted spammers who want stop trying to get a hold of you throughout the day.

Note that blocked contacts will not be able to reach your PBX and you will not be charged for the call.

Intercom functionality with RingRoost

Setting up intercom functionality within your RingRoost PBX is now pretty simple. You will need to change one setting on your physical SIP Phone, then you will be able to dial any extension from another extension by using the dial prefix “*07″. So to dial extension 300 within your PBX and have that phone auto answer (intercom), you would simply dial *07300.

Watch this video for instructions or follow the steps below:

Changing your phone’s settings. The exact process may differ slightly based on your phone vendor, however there is usually
1. Access your phone’s admin panel
2. Look for, and enable, a setting called “Allow Auto Answer by Call-Info” (Note: exact name may change based on phone vendor, will usually be Allow Auto Answer by xxx).
On the Grandstream it will be under -> Accounts -> AccountX -> Call Settings -> “Allow Auto Answer by Call-Info”
allow-auto-answer

After saving your phones settings restart your phone, and you can now dial “*07″ + that phone’s extension from any other phone within in your PBX, and have it auto answer. Pretty cool huh!

You may also disable certain extensions from having the ability to dial other extensions with intercom functionality. If you for example had a person within your company that you don’t want to be able to “walky talky” anyone at anytime….

Simply login to your RingRoost PBX and under that users “SIP Phone Control” -> “Right Click” -> Properties -> Dial Codes -> and uncheck “Allow Intercom Dialing” (Save and save your PBX). That settings looks like this:

Note: We would love to get some feedback on this feature. How easy is it to use? How can we make it better? Any other thoughts?

RingRoost Feature Tracker

In an effort to help develop our product, RingRoost has opened up our feature tracking system to our customers. RingRoost customers may now create new feature & bug requests, vote on features requests,track features, and be notified when new features are released.

We are excited to get our customers more involved in our product development and hope we can offer a more full featured and robust product based on our customers needs.

You can checkout our feature tracker here.Feature Tracker

google voice auto attendant

Many google voice customers in need of an auto attendant system (which google voice does not offer) asked us to document the process of porting a google voice number to RingRoost and setting up and simple auto attendant for their business, so here is our step by step guide.

Port your google voice number to RingRoost.

Porting a number from Google voice to RingRoost is pretty simple, the process should only take you a few minutes and the port will be complete in 5-7 days. You will first need to unlock your google voice number. You can do this here : https://www.google.com/voice/unlock

You should a screen that looks like the below image, then click “Unlock My Number”.
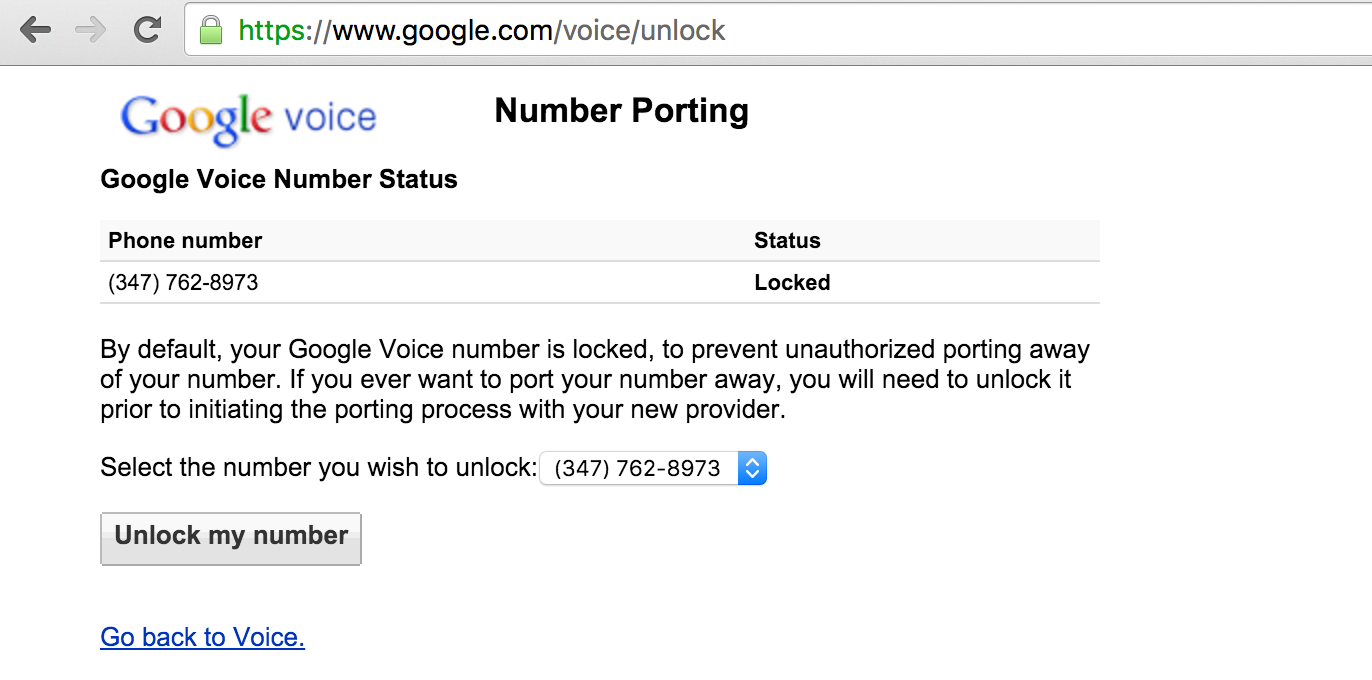
Port to RingRoost

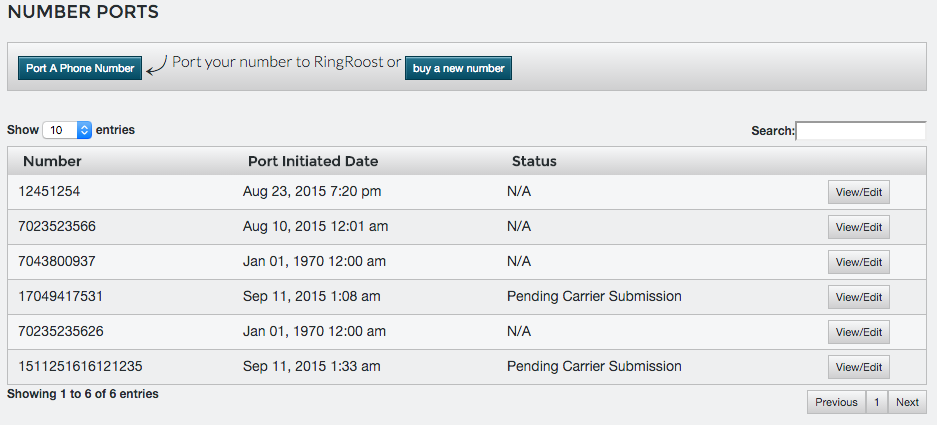
Go to the number ports section within your RingRoost dashboard and click “port a number”.

You will then need to verify that you own your google voice number. Enter your google voice number (no spaces or dashes) and the automated system will call your phone and prompt you to enter verification code. It will look like this:

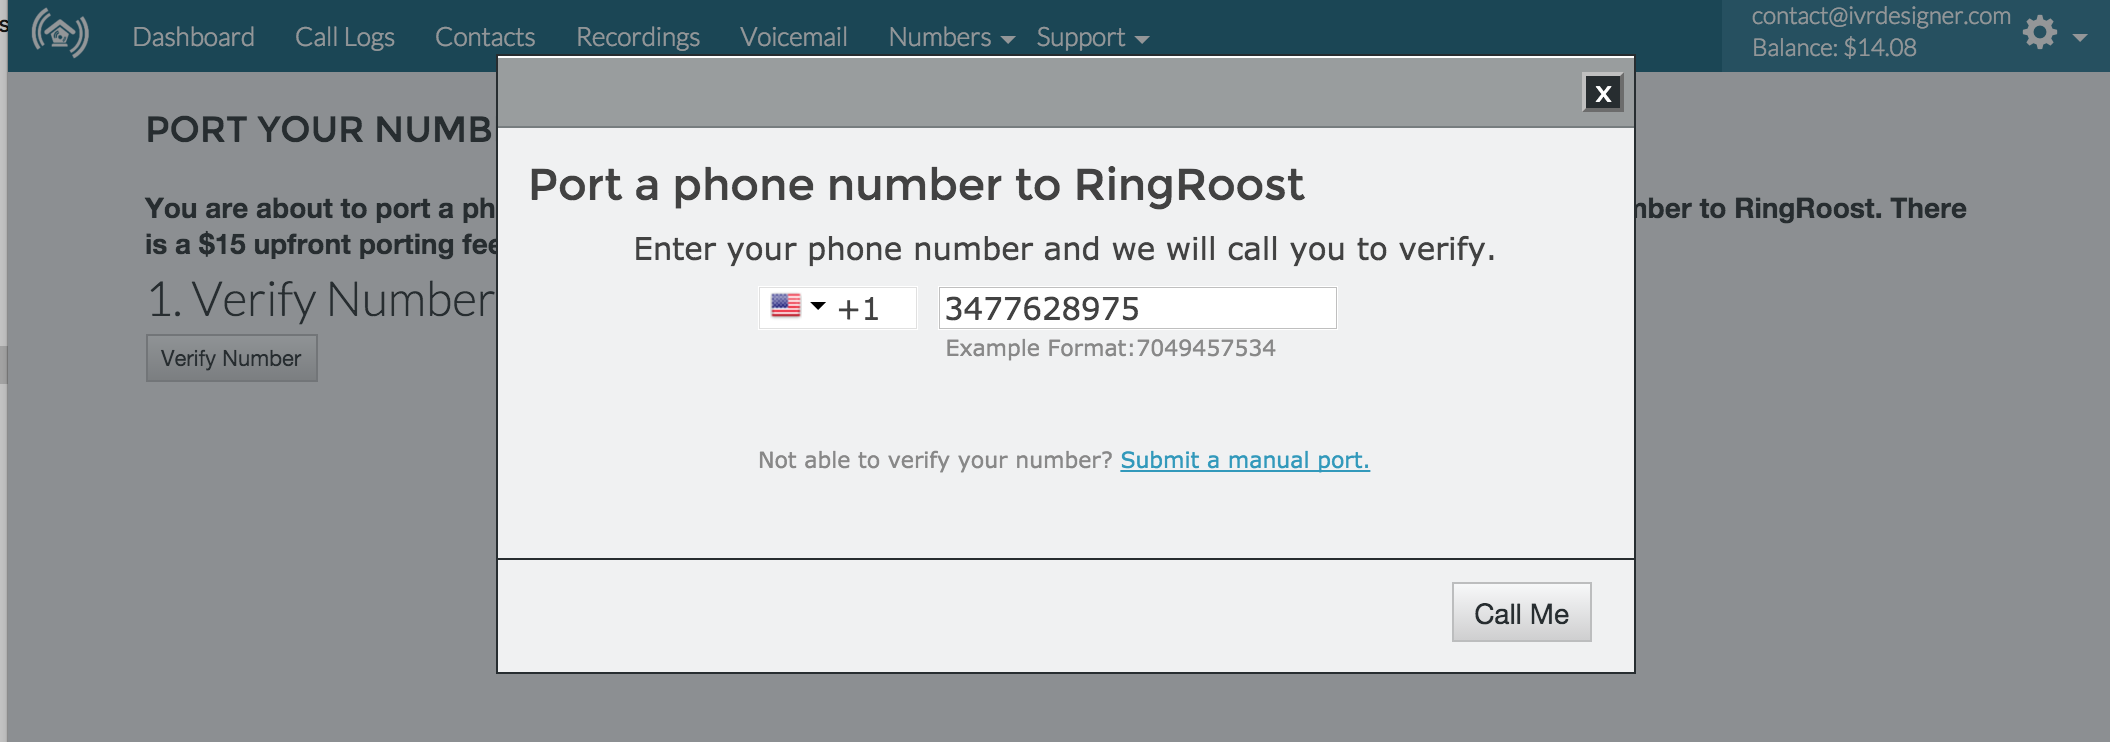
Note: Ensure that your google voice number forwards to your phone number so that your number can be verified by the automated system.

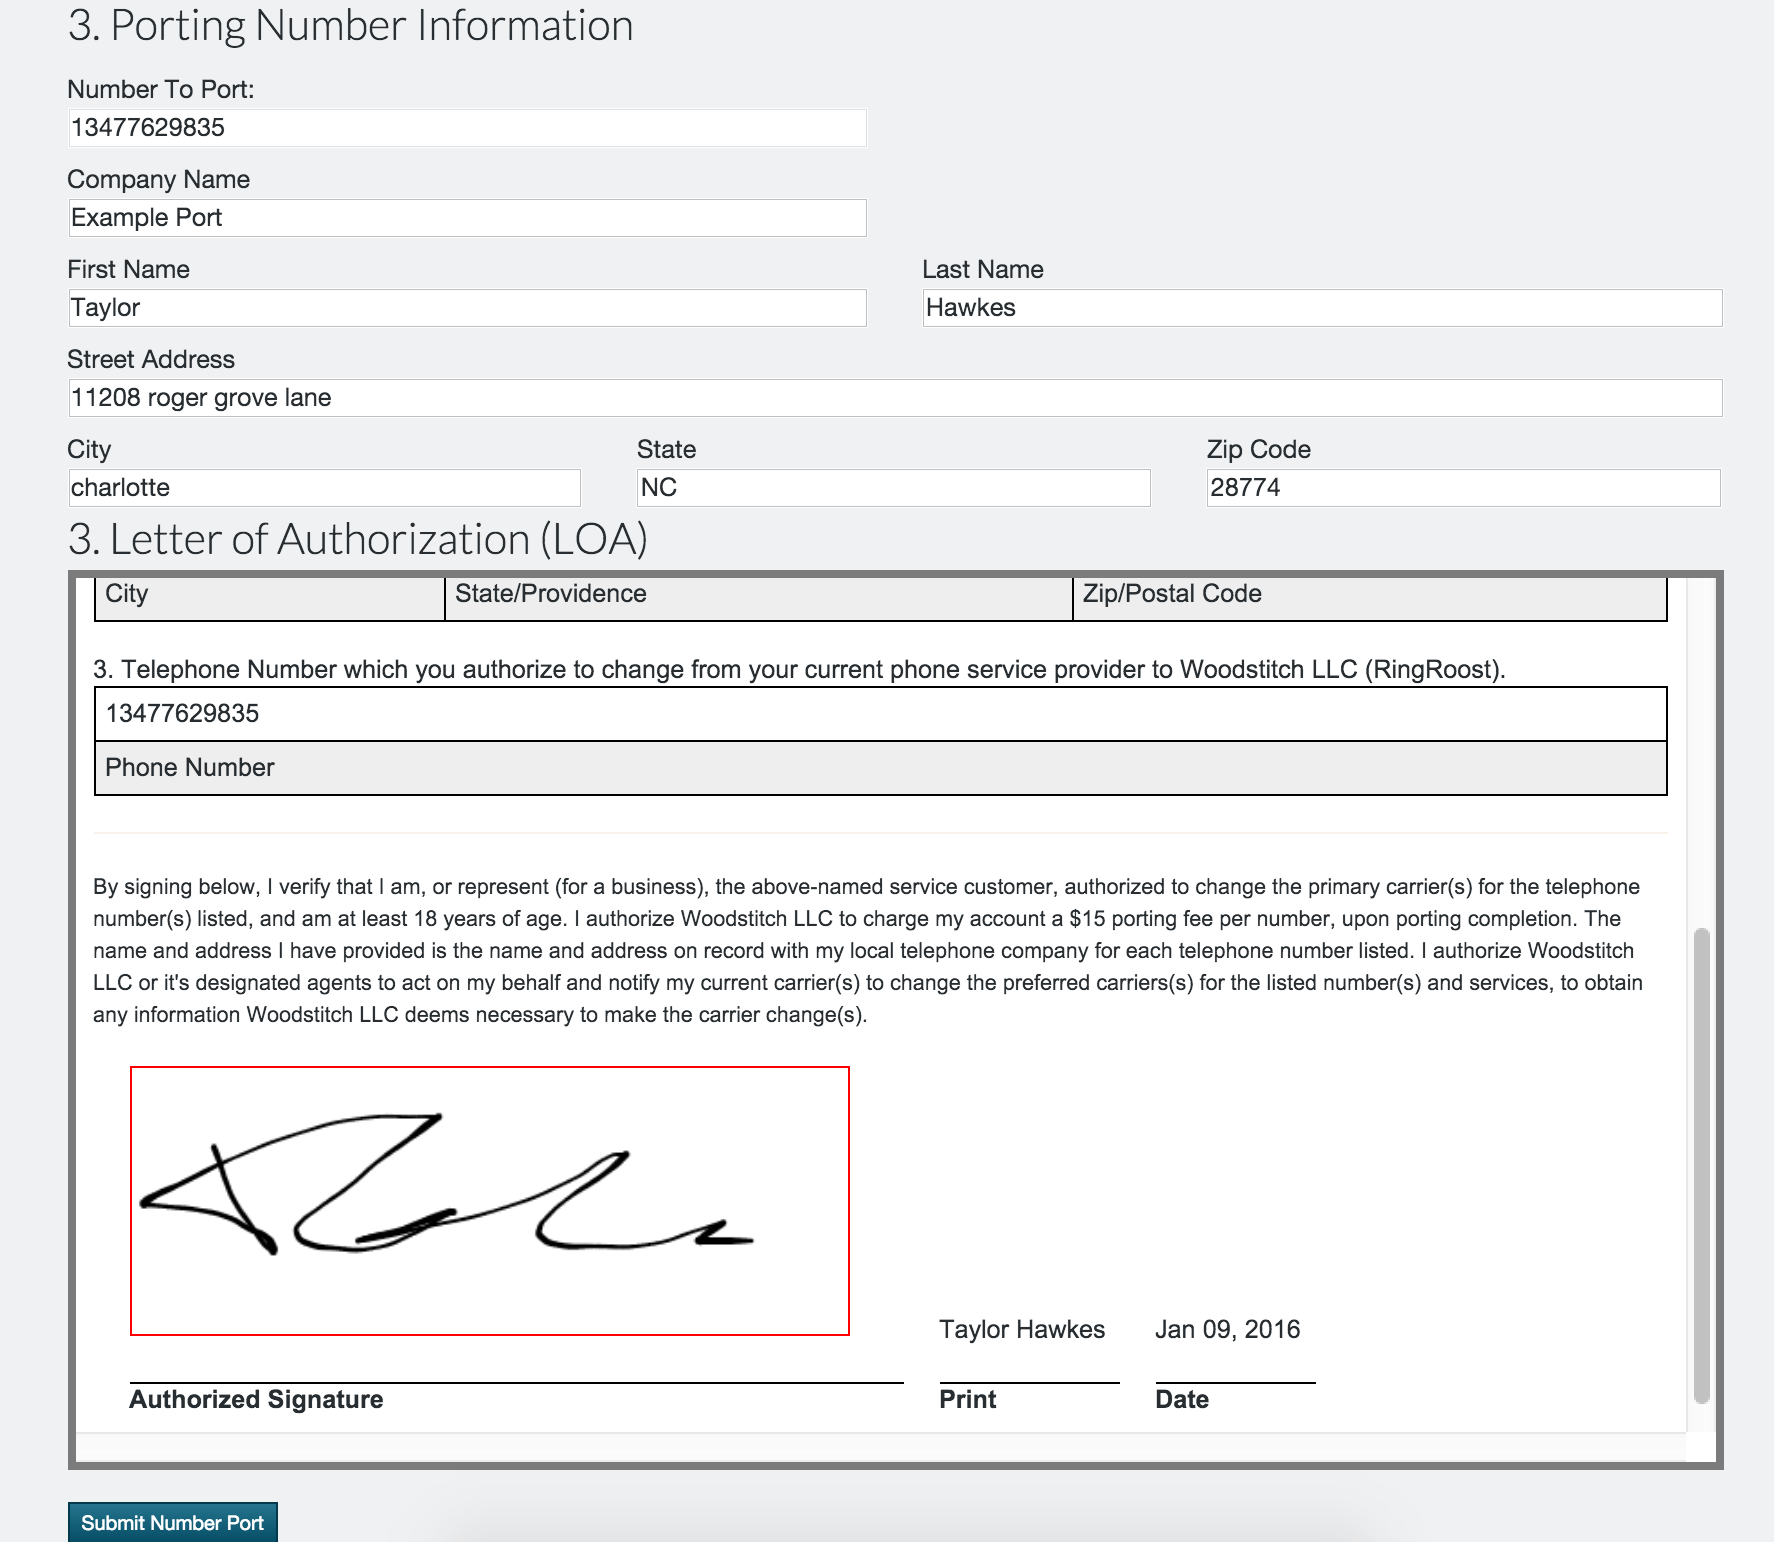
Input the required information to port your number and sign the LOA (letter of authorization to port the number) with your mouse and click “Submit Number Port”. Once the port submission is in place your google voice number will be fully ported to RingRoost after 5-7 days, in the meantime you will likely want to setup an auto attendant on RingRoost so when your number ports your phone system is ready to start taking calls.

Setting up an Auto Attendant

It’s really simple to create and auto attendant through your RingRoost PBX builder, the process should only take you 5-10 minutes to get a live auto attendant up and running.

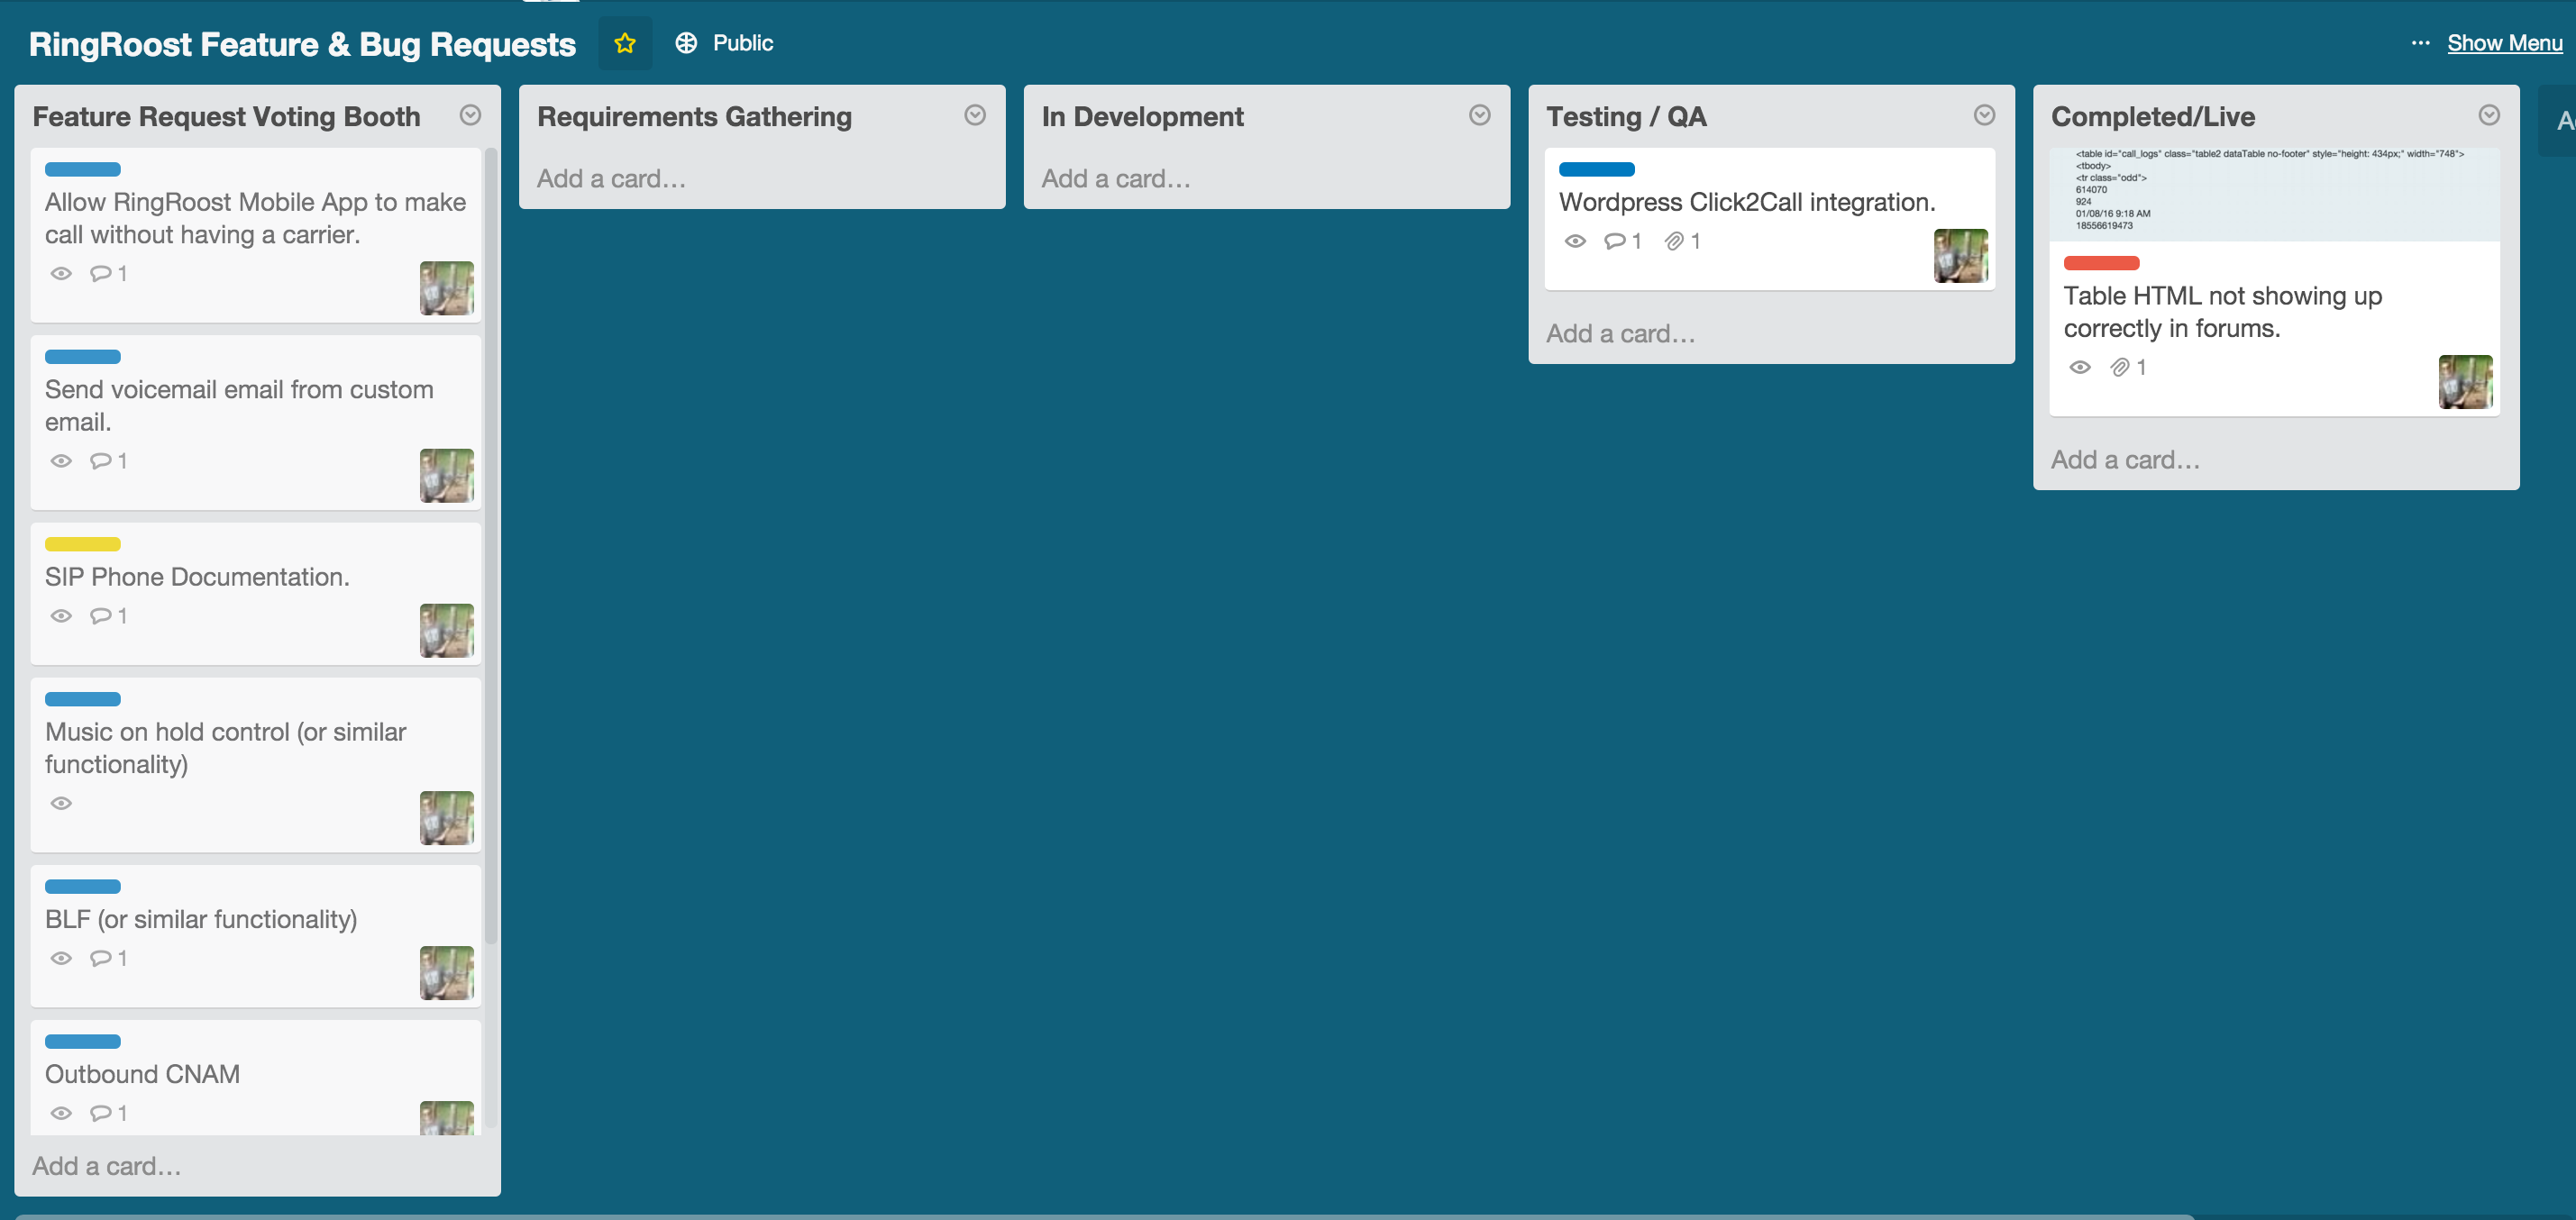
First under your RingRoost dashboard create a new PBX called “My Auto Attendant” (or whatever you want):

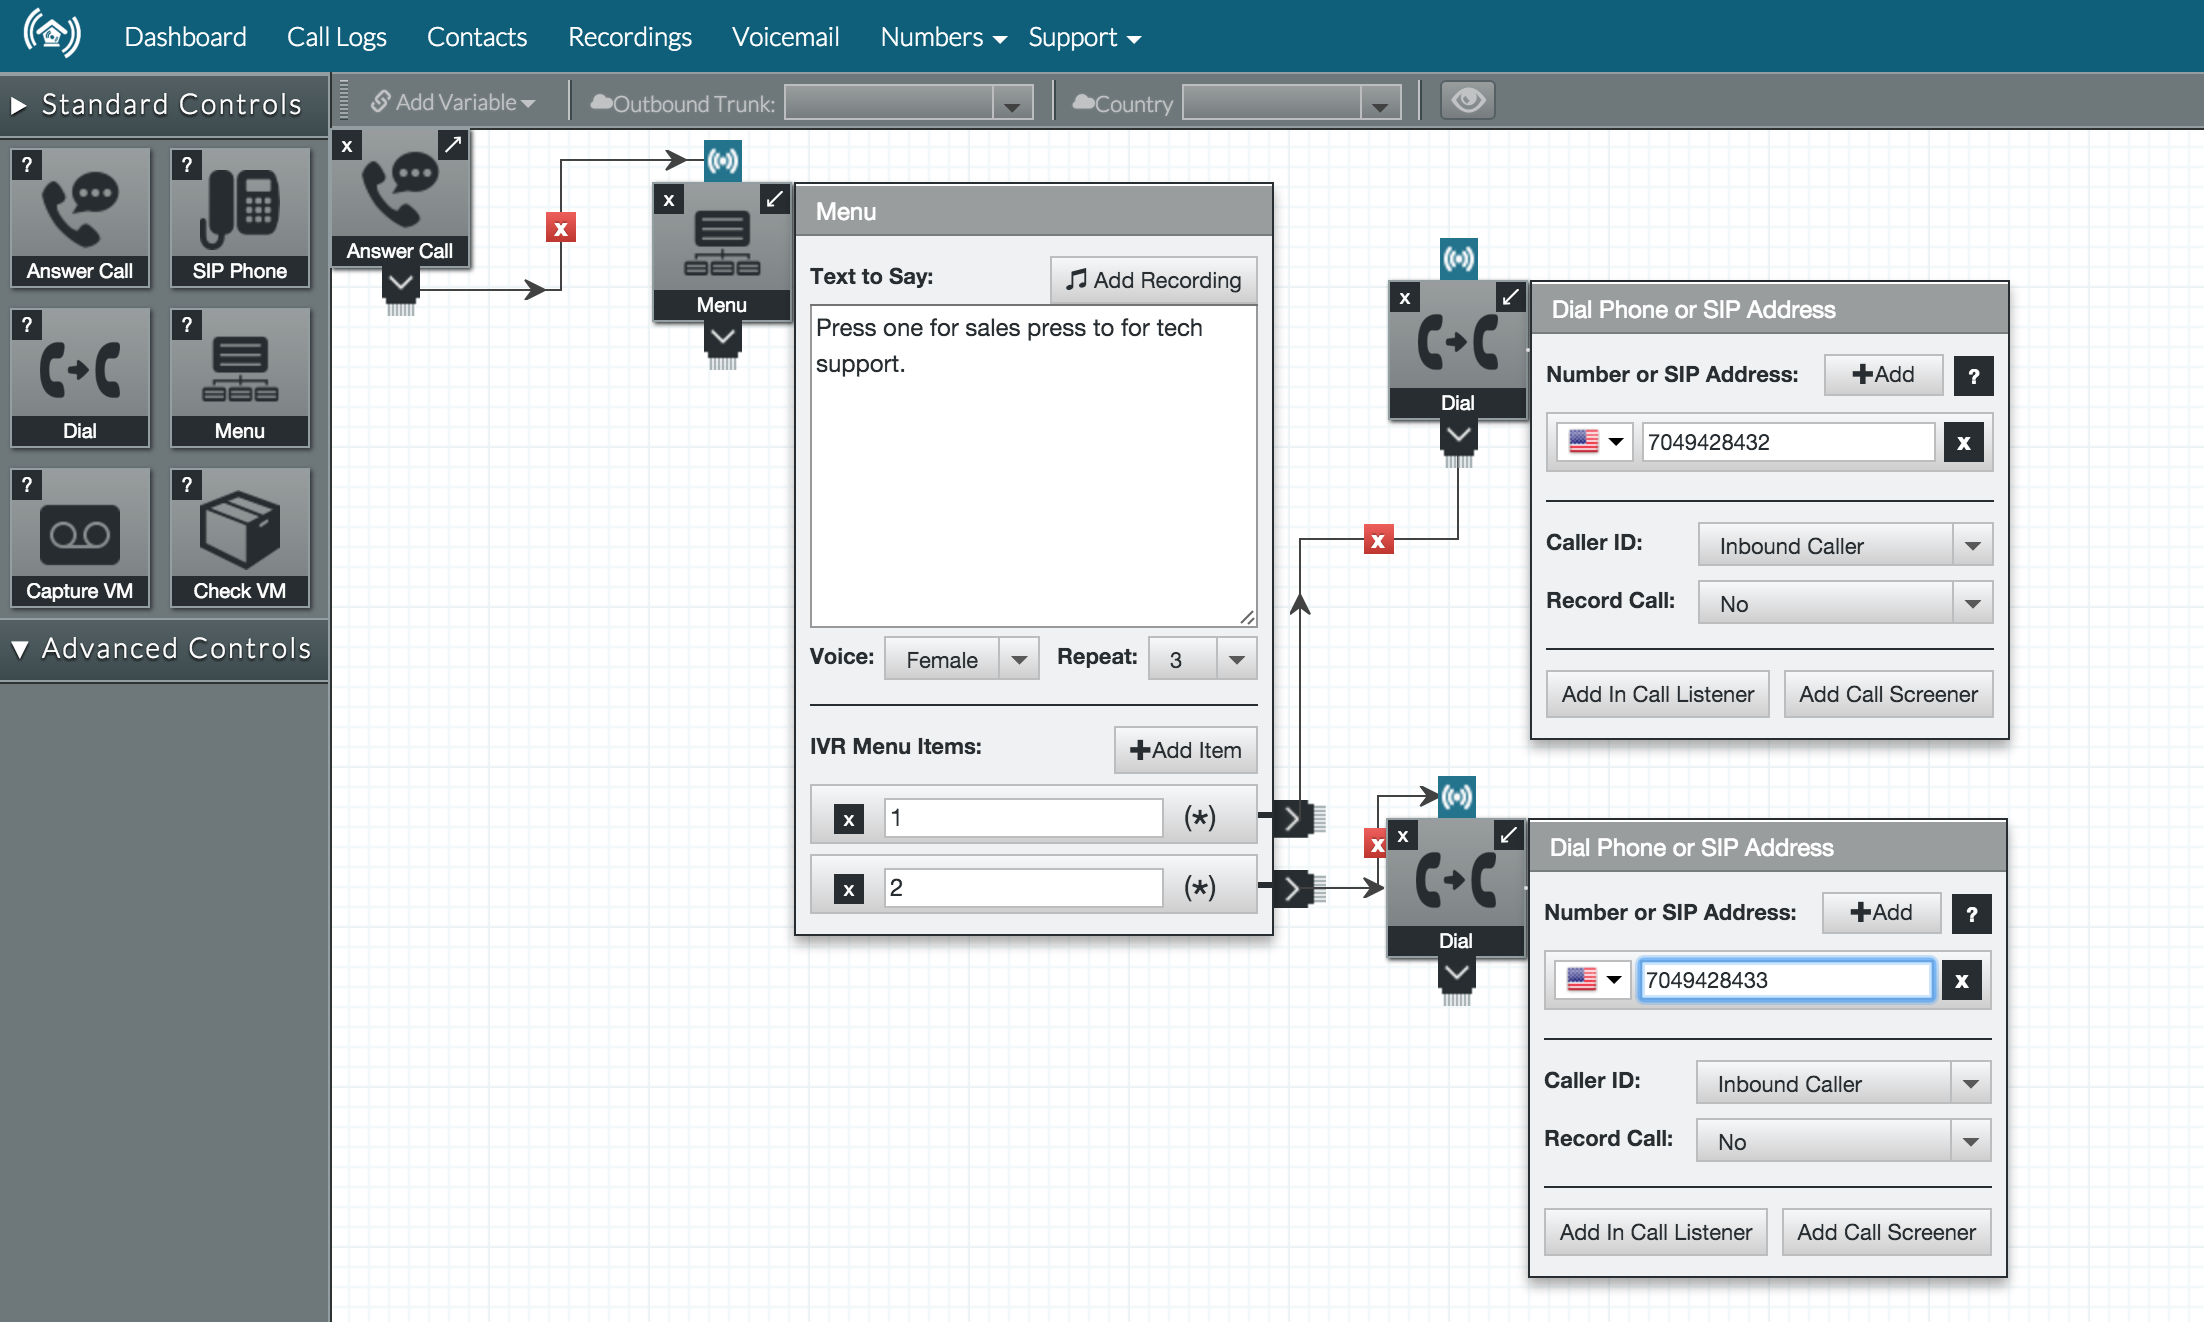
Now click view/edit your PBX, and you will see your PBX builder. Drag and drop the “Answer Call Control” and the “Menu Control” onto your PBX and connect the two elements like so:

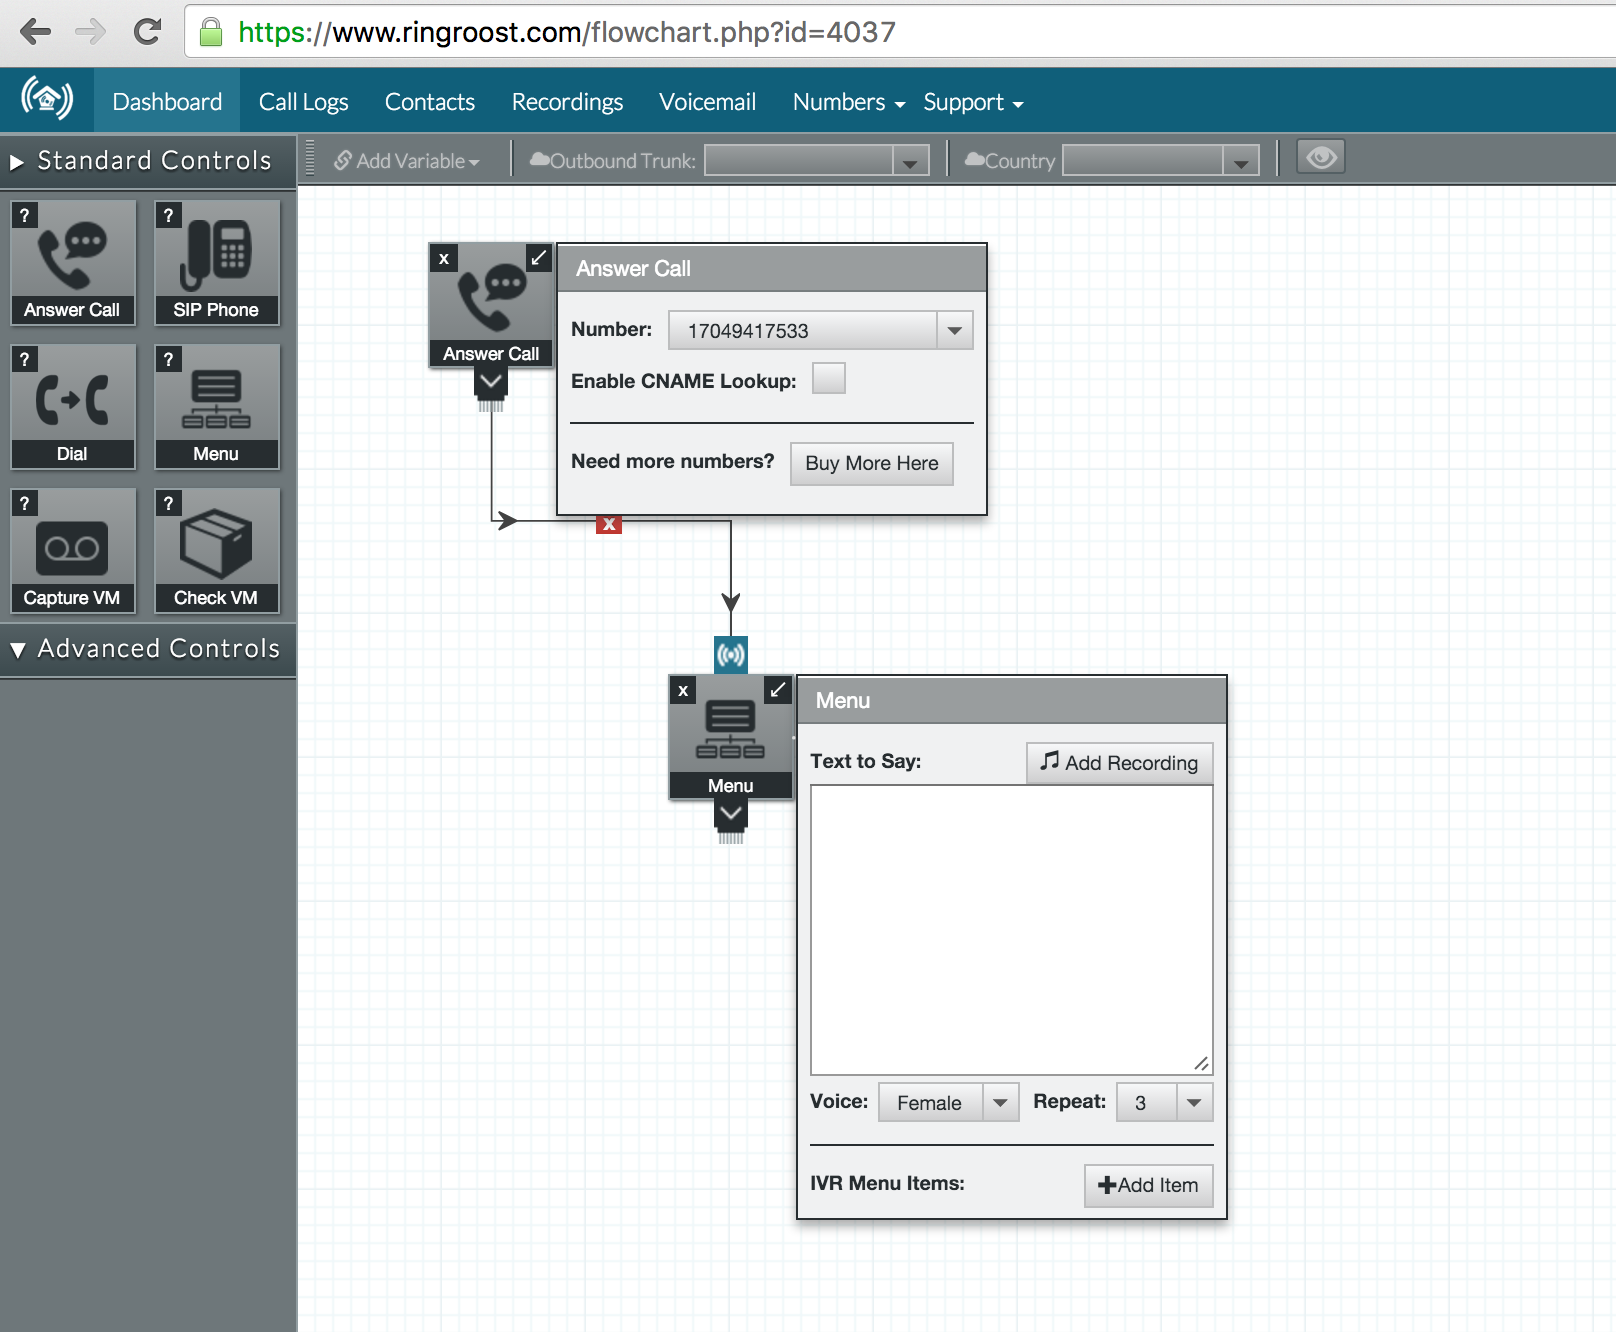
Note: If you are still waiting on you number port to gone through, you may want to buy a phone number for testing purposes until your port is complete.

Next type the text you want the caller to hear and add two menu items (1 for sales,2 for tech support) and connect them to the “Dial Control” with the numbers you want them to connect to. Make sure you save your auto-attendant and try it out, you should now have a working auto-attendant that looks like this:

New Number Porting System

We are excited to announce new porting features, you can now port numbers faster with our simplified porting system . No more downloading and filling out porting forms. Port multiple numbers and track the porting status right from your RingRoost account.

In order to make porting numbers easier we also changed the way you assign third party numbers to your RingRoost account. You can now assign third party numbers under your account settings , and port numbers to RingRoost under the new number porting area .

We offer Local numbers in USA + Canada you can see more about local numbers in your area here. We are proud to support many business phone systems in Baton Rouge, LA and the rest of the USA & Canada.

Screen Shot 2016-01-05 at 1.03.40 PM

To learn more about this and other improvements, follow us on twitter .

Asterisk Installation Guide By Linux and Asterisk Version

Here I will maintain a “How To” list of installing various versions of Asterisk on various Linux platforms. Please tweet me at @taylorhawkes if any of the linked articles are incorrect or outdated.

linux Version Asterisk Version Article
Ubuntu 14 Asterisk 13 https://www.ringroost.com/blog/installing-asterisk-13-from-source-on-ubuntu-14/


Installing Asterisk 13 from source on Ubuntu 14

Ok, so before you read this guide, I have to urge you to consider ditching Asterisk in favor of using RingRoost. If you are a business or VoIP reseller there is nothing that Asterisk can do that RingRoost can’t (except break), contact us or schedule a demo to see what I mean.

Here is a guide on how to install Asterisk 13 on Ubuntu 14. It’s pretty easy/straight forward except one slightly tricky part – which is installing “PJSIP”, so make sure you read along carefully.

apt-get update

We will install Asterisk in “/usr/src”:

cd /usr/src
wget http://downloads.asterisk.org/pub/telephony/certified-asterisk/certified-asterisk-13.1-current.tar.gz .
tar -zxvf certified-asterisk-13.1-current.tar.gz
cd cd certified-asterisk-13.1-cert2/

Install some dependencies:

apt-get install build-essential 
apt-get install libxml2-dev
apt-get install libncurses5-dev libreadline-dev libreadline6-dev
apt-get install libssl-dev
apt-get install uuid-dev
apt-get install libjansson-dev
apt-get install libsqlite3-dev
apt-get install pkg-config

At this point we need to select the SIP library we are going to use in Asterisk. SIP is basically VoIP protocol that we MUST have in asterisk. Version 13 of Asterisk is a little awkward because it can use either “PJSIP” (a 3rd party library) or it’s native built in SIP library. The Asterisk team is encouraging people to use “PJSIP” instead of the native SIP library, so in Asterisk 13 PJSIP is the default library, but on Ubuntu 14 PJSIP must be installed and compiled from source.

So we can do things the quick and easy way (use the old Asterisk SIP library) or the right way (install PJSIP). I will outline both approaches below. If you are new to this I would just do the quick/easy way and then maybe switch to PJSIP later.

1. Use native SIP library in asterisk (quick and easy way)

./configure
make menuselect

Under channel drivers –> select chan_sip (press enter then save by pressing back then “s”). Then continue to compile & install instructions.

2. Install PJSIP (the right way)

cd /usr/src/
wget http://www.pjsip.org/release/2.4/pjproject-2.4.tar.bz2
tar -xjvf pjproject-2.4.tar.bz2
cd pjproject-2.4
 ./configure --prefix=/usr --enable-shared --disable-sound --disable-resample --disable-video --disable-opencore-amr CFLAGS='-O2 -DNDEBUG'
make dep && make && make install 
ldconfig

Go back to your asterisk directory and “./configure” then continue to then continue to compile & install instructions.

cd ../certified-asterisk-13.1-cert2/
./configure

Compile and Install Asterisk

make
make install
makes samples 
make config

Crank asterisk up:

/etc/init.d/asterisk start

Then connect to Asterisk Cli:

asterisk -rvvvvvvvv

Congrats you have at this point successfully installed Asterisk, if your not sure where to go from here you could start by setting up an interactive voice response system on Asterisk which I show how to do step by step in this article: https://www.ringroost.com/ivr-setup-asterisk.php.

Here are some common errors & fixes when you are installing asterisk 13 on ubuntu 14.04.

Error Issue Fix
uuid support not found (this typically means the uuid development package is missing Missing Package apt-get install uuid-dev
JSON support not found (this typically means the libjansson development package is missing Missing Package apt-get install libjansson-dev
Please install the SQLite3 development package. Missing Pacakge apt-get install libsqlite3-dev
Unable to connect to remote asterisk (does /var/run/asterisk/asterisk.ctl exist?) Asterisk not running. /etc/init.d/asterisk start

Thanks to these articles for installing Asterisk:
https://wiki.asterisk.org/wiki/display/AST/Installing+Asterisk+From+Source
http://www.asterisk.org/downloads/source-code
http://blogs.digium.com/2012/11/14/how-to-install-asterisk-11-on-ubuntu-12-4-lts/
http://ethertubes.com/install-asterisk-1-8-from-source-on-ubuntu-11-10/
http://blogs.digium.com/2015/02/24/install-asterisk-13-pjsip-centos-6/
http://asterisk.consulting/tutorial-installing-asterisk-13-with-pjsip-on-debian-ubuntu/

And these articles for working out various bugs/issue I ran into.
http://www.cyberciti.biz/faq/linux-unix-bsd-extract-targz-file/
http://forums.asterisk.org/viewtopic.php?f=1&t=90407
http://askubuntu.com/questions/378558/unable-to-locate-package-while-trying-to-install-packages-by-apt
http://stackoverflow.com/questions/1089741/how-do-i-obtain-use-libuuid
http://askubuntu.com/questions/567740/configure-warning-please-install-the-sqlite3-development-package
http://stackoverflow.com/questions/2800924/asterisk-unable-to-connect-to-remote-asterisk-does-var-run-asterisk-ctl-exis
https://wiki.asterisk.org/wiki/display/AST/Building+and+Installing+pjproject
https://wiki.asterisk.org/wiki/display/AST/Migrating+from+chan_sip+to+res_pjsip
https://wiki.asterisk.org/wiki/display/AST/Setting+up+PJSIP+Realtime
http://blog.gmane.org/gmane.comp.voip.pjsip/page=59
https://trac.pjsip.org/repos/wiki/Python_SIP/Build_Install
http://lists.pjsip.org/pipermail/pjsip_lists.pjsip.org/2013-December/016912.html

Registering a Zoiper Softphone with RingRoost.

Registering a Zoiper Softphone with RingRoost is a breeze. Simply drag and drop a “SIP Phone Control” onto your PBX. As shown below:

Screen Shot 2015-02-13 at 3.06.35 PM

Then open up Zoiper and under settings -> General put your SIP username/password in the appropriate fields:
Screen Shot 2015-02-13 at 3.08.14 PM

Ensure that you have “u-law” set as your Codec on Zoiper:Screen Shot 2015-02-13 at 3.15.27 PM

Pick up our phone and make a test call, it’s as simple as that.

See what else you can with RingRoost by checking out the help videos and other resources.

Stay connected with ringroost